Suffed Mushrooms

This is just a little something that I whipped up with some stuff I found in the fridge.

Jpeg

yum yum

Ingredients
2 flat mushrooms
2 spring onions
2 handfuls of grated cheddar cheese
Salt and cracked black pepper

Method
Pre heat the grill to medium heat
Peal the mushrooms and take the storks out (if you have really fresh mushrooms you don’t need to peal them)
Place the mushrooms gill side down on a baking tray and brush the with oil
Place them under the grill for 5 minutes
While the mushrooms are cooking cut u the spring onions into small slices and put them in a bowl with the cheese and at the salt and cracked black pepper to taste, mix them all together
Remove the mushrooms from the grill and turn them over, then cover them with the cheese and onion mixture
Place them back under the grill for another 5 minutes, till the cheese is bubbly and starting to brown.
Serve.

The Fleecie Top

A while back my Mother-in-Law bought some lengths of fleece fabric with the idea that I make each peace into a blanket for a different member of the family. This project never got underway and during a summer clear out if found the fleece stashed away in my cupboard, where it had been put out of the way and forgotten about.

The idea of edging that much fleece with binding or blanket stitch sounded really boring (which was probably why I hadn’t started the project in the first place). I had seen a basic pattern for a really simple top in my most recent sewing magazine and decided to use it as a bace for making the fabric into snuggly tops.

IMG_1072

First things first I laid out the fabric,  so that the selvages were together. I have only one meter by the width of the role to work with for these tops meaning that everything needs to line up just right fist tim and that I need to make sure that I am getting the most length that I can out of each bit.

I then cut down the folded side.

IMG_1069

Once the front and the back were separated, I used the measurements form the pattern to make the neck hole, making sure to fold each fabric peace right sides together down the middle.

IMG_1070

Front of neck hole: 12cm’s down the folded edge, and 12cm’s from the fold toward the edge, cut in an arc.

IMG_1073

Back to neck hole: 3cm’s down the folded edge, and 12cm’s from the fold toward the edge, cut in an arc.

I then laid the top sections out right sides together of course, and stitched along the shoulders.

I then pinned some bias binding around the neck hole. Making sure the open out the seams the seam allowance form the shoulders. (you don;t want lumps.)

IMG_1075

It is important when working with bias binding to make sure that you chose a size of binding that is wide enough for what you are doing. Otherwise you will end up missing the binding on the underside when you are sowing, which just makes an awful mess.

Once the binding had been sewn, I pinned up the sides. Now this is the fun bit. Make sure that you leave arm holes, and make sure you make them big enough. On this type of top it is better to leave the armholes to big than to small.

Sew down the length on the side from the armhole to the lower edge. Then hem around the bottom, opening out that seam allowance again.

Almost done. The last thing to do is to fold over the excess fabric around the arm holes and sew it down. There all done.

These tops are really simple and take about and hour to an hour and a half to make each.

IMG_1077

Comfrot Food

IMG_1041

Ok so this may seem odd to you, but this is one of my favourite comfort foods. Scrambled eggs with onion, bacon and cheese, a little salt and lots of cracked black pepper.

Lovely.

When I was young my mum used to make the scrambled egg in the microwave, but I find that too dry. I mush prefer to use a saucepan. The inly problem with this method is that you end up with a lot of liquid in the pan. Don’t worry about it its just the fat in the milk and/or cheese. Just strain it off with a spoon, especially if you are having your egg on toast. (cos soggy toast is gross)

Snowman in Summer

So yesterday was my little one’s 4th birthday, and she is as she is obsessed with Olaf from Frozen I decided to rise to the challenge and make her a birthday cake with her favourite snowy friend.

I have always made my home made sponge using a traditional recipe of equal parts sugar, marge , flour and 3 eggs. However I find this does not give a very good rise on the cake and that it does not cook very well when all dumped into one pan. So I searched the internet for a different recipe for the sponge, one that would cook properly when all in one pan. I used this recipe. Cake Recipe (the one typed in the blog, not from the video)

However as I only have one 7 inch tin I made one cake on Sunday evening, and then another one on Monday morning. While I was waiting for the second cake to cool I put a thin layer of strawberry jam in the top first cake for the filling (I actually had the cake upside down as this gave a more level surface to work on )

12011444_10207168839436565_510346273_o

Next I made some butter cream, for this I used a new product that is available from Stoke. It is a marge and butter blend, making it not a soft as normal marge and less stiff then regular butter. It still goes solid if left in the fridge so I had left it out over night to let it soften.

12005827_10207168838756548_1874303123_o

I blended the Icing Sugar and butter together with an electric hand whisk cos I am impatient. I then spread it over the top of the jam on the cake, using a spatula to get a even spread without contaminating the butter cream with the jam.

12020725_10207168838956553_1471191271_o

Once the other cake had cooled it was time to get it out of the tin. I had to use a pallet knife to get it out even though I use those expandable cake tin, as I had over done it a bit. but I placed the second cake on top of the first and ran the pallet knife round the edge to make sure they were level.

I don’t know about you but my oven (even though it is a fan oven) has one area that does not get as hot as the rest and so I had slightly wonky cakes where they had not risen as much on the cool side so I made sure I put the bigger side of one cake to smaller side of the other, so that top was flat and the end result was even.

12018518_10207168839236560_222367378_o

I then covered the cake in the thinest possible layer of jam. I don’t boil my jam before coving the cake to ice it as I have LeCruse Cast Iron pans and it is impossible to get the jam off of the bottom of them and I always end up with a sticky mess.

The cake ended up staying at this stage until the evening as I had run out of icing sugar. But I did dye my icing and rapped it in cling film to keep for later. I used shop bought ready to roll white icing as I can’t be bothered to make my own. I still ended up having to go back to shop again, as I made a mess of the fist peace of blue icing and had to go get some more.

12006888_10207168839316562_1301343170_o

Using an image form the internet for a guide I pained a green section on the blue to be grass, then got out my garlic press and pressed some icing though to make 3d grass. Then I made a rug by painting stripes of a rectangular peace of white icing, with I the laid on the cake, I put the grass around the rug making sure not to squish it all together. and then on to the snowman. Olaf was some what tricky and I could not get the mouth right but with a little help from my partner I got there in the end.

And so we have the result of all my hard work.

12020263_10207168838996554_1293783185_o

suffice to say I had one very happy little girl.

Back to School

When I started this blog it was very late in the school year and that meant that I very quickly came against the six week summer holidays, which put a hold on all my plans for this blog.

However the holidays and over and I have big plans for what I want to do from September to get this blog really going and to have a successful and fulfilling end to the year, with lots of items created and with Christmas just around the corner,  15 weeks I am told, I have lot of idea’s for craft projects to make fun presents for everyone.

Day 1 – Tiding and sorting.

Wet Wednesday

Though it did rain here on Today (Wednesday), that is not what this post is about.

Wet Wednesday is the nic-name I give my daughter aged 3 and 3/4 when she is being soppy and bursting into tears about everything.

This weeks Wednesday has been one of those days. She is normally a very out going child, who is into everything and bouncing about. However some times she is totally over come with a day where she just wants to sit in front of the telly and cries about everything. Even the little things, like going to toilet, or because she got her favourite Jam, that she actually asked for, in her sandwich. (I totally don’t get that one)

What is most difficult about those days for me is that they completely take over my day as I have to spend the whole day sitting hugged up on the sofa watching Doc McStuffin’s, Sophia the First and Curious George with her. Which though is lovely for a time, does leave me felling very unfulfilled.

On one of these days around easter I sat myself down and had a think about what was coursing this to happen to an otherwise lively and independent child. The answer I came up with is that we have no groups or pre-school on Wednesdays and she misses her friends, and the structure that the groups give her. They also take her mind off the fact that her dad is at work. She is very strongly bonded to her dad and cried every minute he was not with us in hospital when she was first born. They sent me home early in the end just so that other people on the ward could get some sleep.

The solution I have decided is to put her in pre-school on a Wednesday for the full day, and drop the Tuesday afternoon session she had been doing. We have a group on a Tuesday morning, and with some planning I will be able to organise an activities to do with her in the afternoon, such as baking, sewing or even helping her with her reading and writing.

So back to creativity tomorrow for me…

Short Jeans

As I said yesterday: I am tall. When I was in my teens the only way to get trousers that fit was to buy from Long Tall Sally (expensive) or have my dad pick something up in the States. One year I asked for some jeans in a 36W/36L, having measured up wrong I was way off with the waist measurement and they were miles to big on my then size 10 self. So I shoved them in the back of the cupboard and forgot about them.

A couple of weeks ago I was going though some bags of old clothes out of my mother’s loft, getting them ready to donate to my Daughter’s Pre-School, when I came across said jeans. Seeing as they are men’s (the only way to get that size) I thought I would put them aside and see if they fit my Partner. Which they did. However he only has a shorty 31 inch leg. This meant I would have to take them up.

There are a couple of big problems with taking up jeans.

  1. You loose that nice hem at the bottom,
  2. Denim is really thick and is a pain to get though the average sewing machine.
  3. The normal way of doing a turn-up makes it really obvious they have been adjusted.

I therefore have a better way of taking them up that preserves the original hem and  can mean absolute no cutting, and no need to trawl haberdasheries looking for orange thread. (Seeing as I did this before I decided to start the blog there are not going to be many pictures)

Unlike the normal method of hemming you do not need to turn the jeans inside out.

First work out how much you need to take the jeans up by, In this case 5 inches. Then half it, so 2 and 1/ 2 Inches.

Measure Measure Measure

Measure Measure Measure

Next take your sewing gauge or tape measure and turn the leg up the outside, so that the inside of the leg is showing. And pin it, measuring to make so that the edge of the turn up till the line of orange stitching on the hem is your halved amount (2.5 inches)

The stitching

The stitching

Run the legs though the sewing machine, using a thread as close a possible to the colour of the denim. Keep as close to the edge of the original hem as possible. Once you have sewn them. Iron the fold in the denim.

Now comes the clever part!

Tuck the inside part that is on the outside up the inside of the leg along where you have sown, so that the original hem is at the bottom of the trouser leg again. and use your iron to press along your sewing line. Once the jeans are on, the original orange hemming stitch will detract from your new stitch line so that it is almost unnoticeable.

Ta Dah

Ta Dah

The Short Answer

I am tall. That is the fact of it, I am above average high and long in the leg to boot, and though there is nothing wrong with that, it does make getting trousers that fit a right pain in the behind.

I have three pairs of linin trousers from Primark, which to be honest look totally stupid on me. They are way to short, and that makes them look rediculas. “So” I asked myself, “what can I do to make these work for me”.

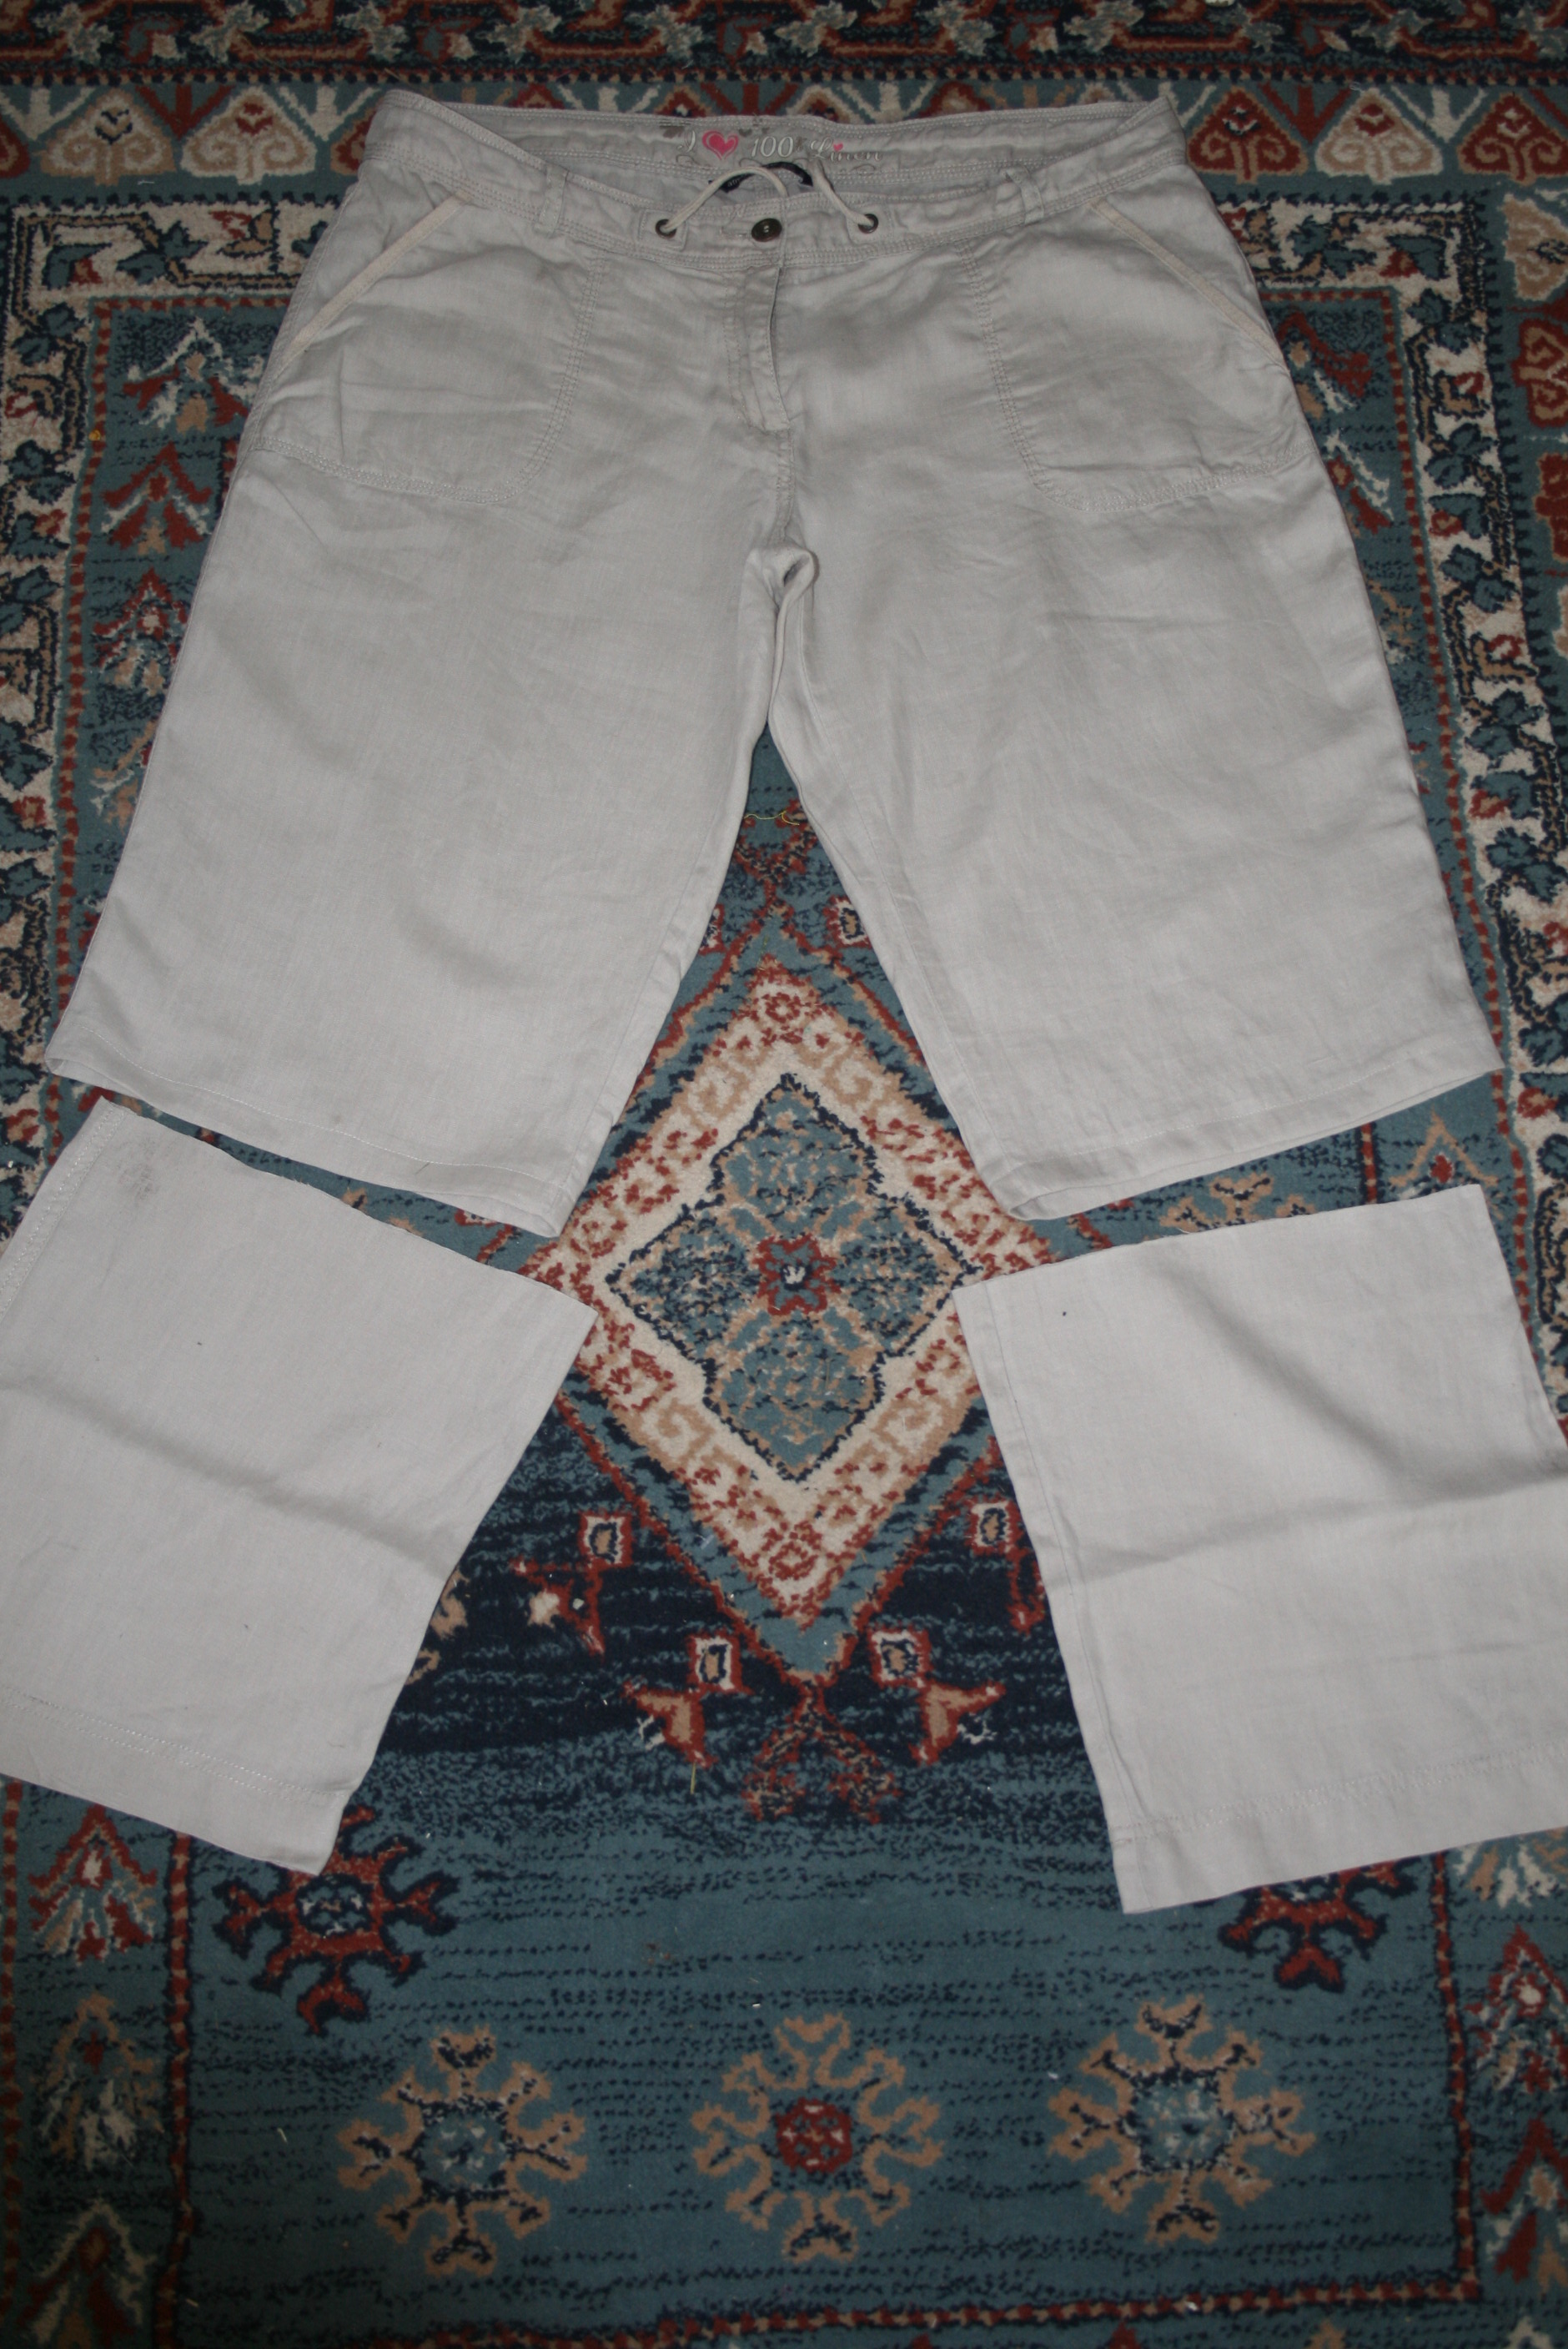
The Answer: Make them into shorts.

Cream linin trousers after the conversion to sorts, with the cut offs.

Cream linin trousers after the conversion to sorts, with the cut offs.

This is such a simple process that takes at most half and hour.  Which I will explain in this blog post.

The first thing to remember when working with linin is that everything creases it. I always iron anything linin before I start work on it and keep the iron plugged in so it is right at hand when I need it later on.

Before I even started tying to convert the trousers I put them on and got my partner to put a single pin in them just below the knew. Then I took them off and laid them out on the floor. This gave me an idea of how much I was going to need to cut off, and by measuring how far the pin was from the hem line I was able to take the single pin out so that I could iron them.

Next I used my tape measure to measure up to where I would need to cut, in this case thirteen inches from the hem, and placed pins in the leg at regular intervals across the leg. Making sure to measure each time.

Cut off but still to be hemmed

Cut off but still to be hemmed

Once I had a line of pins across each leg I cut off the just below the line.

With the pins removed it was now time to put on a new hem. This is the more basic this to do, and I am often surprised by how many people don’t know how to do it.

Here are a few of my top tips:

  1. Don’t rush.
  2. Use lots of pins.
  3. Pin all of one leg and then the other.
  4. Measure, Measure, Measure.

Folding the fabric back and the back again creates a good solid hem that will not fray. For this project I have put in a one inch hem. By that I mean I heave folded  the fabric up one inch and then turned it over one inch again so that I have I can see one inch of fabric. and the raw edge of the fabric is tucked snuggly inside, where it is protected.

Sewing Gauge in use

Sewing Gauge in use.

I used used a Hemming Gauge or Sewing Gauge, whatever you want to call it to I check that I had made my hem even all the way round, and made sure that it was pinned securely.

In this method I will be using the sew machine to sew the hem which will leave me with a line of visible stitching around the bottom edge. I have tried to sew what I did in pictures, however I used dark blue cotton and that means that it is not always easy to see.  I will go further into some of the techniques I use, and the features of my Sewing Machine in a later post.

Turned up and pinned ready for machineing

Turned up and pinned ready for machining.

Uh Oh

Uh Oh

I ran the machine around one leg just fine, but as usual when it came to the other leg I hit a snag. The bobbin thread had gotten it’s self in a twist and had court around the bobbin post. (How to sort this out will be gone over in more detail another time)

This courses a great snarl up in the cotton and will prevent the sewing machine from running. It is really bad for the machine., and for your fabric.

Stitch ripping tool

Stitch ripping tool

Once cut free from the machine I was able to use the Stitch ripper to take out those loose knotted stitches, I also took out the last few good stitches leaving me with a thread end to tie off with later.

I then started from the last stitch and worked my way round the rest of the leg, making sure to keep the machine as so as possible to help prevent further snarl ups.

Pins out, and turned in the right way again, I ran the iron over them one final time making sure that I had pressed in the new hems.  And there we go, one pear of knee length sorts. Which look a lot better than the original to short trousers.

Done

Done

Mummy Makes

Sewing-machine-566x361

Hello and Welcome to my mew blog.

I am a stay at home mum and I fill my “me” time with craft projects and creativity. I have chosen a predominately sewing theme for my blog, but that is not my only skill and I hope to share a bit of everything I do with you.

I have made this blog to help me keep a record of my achievements and to help keep my spirits and motivation up. Like many of us i struggle with depression, low motivation and confidence issues. The blog is to help me see what I can really do when I put my mind to it, and hopefully inspire others as well.

The idea came about while I was sitting on the living room floor, working turning up some old 36″ inside leg jeans it they would fit my Partner’s short 31″ legs. “Why don’t you blog about this? Silly, show off what you can do.

So I decided to give it a try. Hear goes…